
Command Center Reveal!
As any busy family knows, being organized is essential to avoiding communication breakdown and loss of sanity:) I feel like I'm constantly organizing and re-organizing only to feel like I need to organize myself again. But during the rare times when I actually am organized, I feel a lot calmer, relaxed and able to tackle my to-do list without running around in circles like a chicken with my head cut-off. So when I decided to venture out and start blogging, I realized I really need to get my #@$! (stuff) together and get organized once and for all! So I kicked my husband out of the office (love you dear) and began my 'organizing my #@$! spree'! I started by creating a few little projects to make my life easier, such as the DIY Dry Erase Board and the DIY Linen Covered Cork Boards projects. These little projects were all a part of a bigger picture I had in mind of creating a central command center to run family & blog life harmoniously.
Now that it's FINALLY finished, I couldn't be happier!!

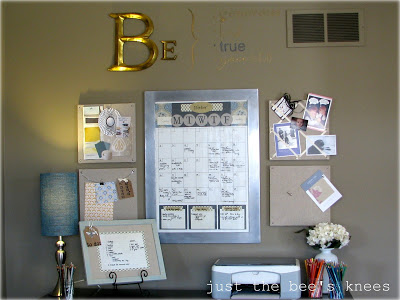
It's got everything I need to keep me on track. I use my Dry Erase Board
to write down my daily to-dos (I did modify it a teeny bit from the original post! But that's just because it worked better horizontal than vertical and the colour of the frame was a little too bright. Perfectionist, I know. Can't help but keep tweeking things:)
I also made a Dry Erase calandar using an old frame that I had bought at IKEA as well as some scrapbook paper and embelishments. I'm not a big electronic calander girl. I like the good old pen and paper, write stuff down and cross-it out method! So this oversized calendar works great for me. I can see everything we've got going on for the month laid right out in front of me.
Also, the DIY Linen Covered Cork Boards really come in handy to pin up inspiring pictures or fabric samples I come across. As much as I'm loving Pinterest these days, there is really something to be said about a good old fashioned inspiration board!

We already had the credenza which has great storage for all my binders, paperwork, books and drawing tools. These silver tins were from the dollar store, left over from my Wedding centerpieces!

I painted and distressed a ceramic canister I found at a garage sale to accessorize the shelving some more. It also doubles for storing bits of junk you don't want cluttering up your drawers:)

I also wanted to add a little more visual interest to the wall. Those of you who know me well know that I just LOVE typography! Especially 3-dimentional letters:) So I naturally wanted to add a little something across the top that was inspiring to me, like a word or a phrase. I came across these wall letters at Hobby Lobby and originally intended to spray paint them a metallic silver, but after I brought them home, I really liked how the gold looked mixed in with the stainless steel frame and the soft turquoise accents, so I decided to keep them just as they are.

Instead of using just one big word, I was inspired by the 'BE' to create a little saying to remind me to always be myself and decided to paint it on using a simple letter transfer method.
So here's the breakdown on how I created this painted quote in case you decide to make one too:
First, decide what you want your quote to say! I thought about words to describe how I want to 'BE' and came up with 'generous, kind, true and you'. (I saw a quote on pinterest that took the word beautiful and broke it apart to say 'be-you-tiful'. I loved it! So I changed the 'you' in my quote to reflect this.)
Use a word processing software (like Microsoft Word) to type out your quote and scale it to the size you want using the font you want. I printed mine out on 8 1/2 x 14 paper then taped it together as the quote was too big to put on one piece!

Once you have it printed out, flip it over and rub a pencil (the softer lead the better) over the entire back of the print to be transferred.

Once you have done that, tape the image on the wall where you want it to go.
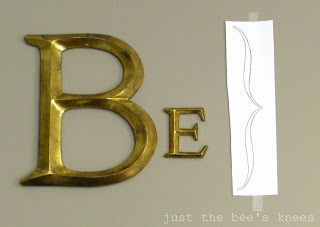
Using a sharpened pencil or ball point pen, simply trace the outline of the image. Once you are done, remove the paper and the pencil will be transferred to the wall!

It's kind of hard to see on this image, but I'm sure you get the jist!!
Next, grab your paints and get painting! I used Martha Stewart craft paints in some of her Metallic colours.


And there it is folks! Super simple one of a kind wall quote!

Now if I can only figure out how to hide the gosh darn ugly air vent!! Covering it up is not an option, so what to do, what to do? I tried adding a shelf underneath one in another room and leaning a picture over it as to not cover it completely, but it kept blowing over! I was also thinking of adding something else to the other side of the "B" just to off-set it and divert the eye away from this monstrosity. Anyone have any great ideas? I'd love to hear them!
Here's a few more images from the rest of my office-in-progress.

I need to accessorize my desk a little bit more and add a desk lamp. The tray was an old red laquered tray I had laying around. A coat of metallic silver spray paint gave it new life!

I'm also on the hunt for a chair or two for in front of the window to add a cozy reading nook. A few more accessories on the wall beside the mirror and this room will be complete!
Well I guess now I really have no excuse not to be organized!
Until next time!
Linking up to:
Home Storeis A to Z
Thrifty Decorating
Sew Woodsy
Handy Man, Crafty Woman
Blue Cricket Design
Organize & Decorate Everything
Saved By Love Creations
Not Just A Housewife
Thrifty and Fabulous
The House of Hepworths
Remodaholic
The Shabby Nest
Chic on a Shoestring
Simply Designing
Fingerprints on the Fridge
Between U & Me
Tatertots & Jello
Funky Junk Interiors
Under The Table & Dreaming
Thrifty Decor Chick