
DIY Roman Blinds with Grommet Detail
One of the most common comments I received on Carson's Room reveal post was regarding the Roman Blinds and how I made the grommet detailing on the bottom. So today I am sharing how I did it!

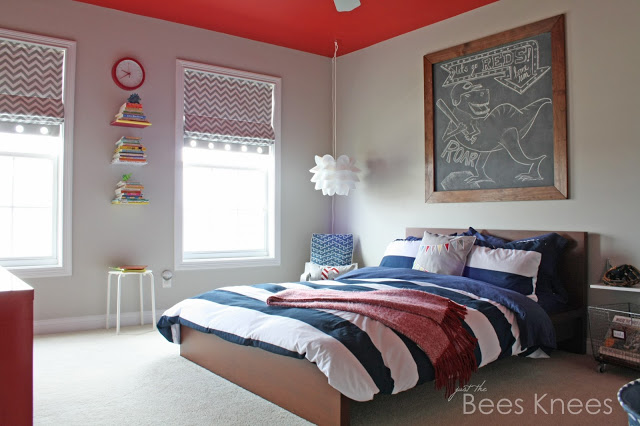
What transpired was the idea to add trim on the bottom with grommets as a decorative detail. It was the perfect solution! The were still simple, yet fun and boyish. And they look perfect in his room. I actually like them better than the original plan! Talk about turning lemons into lemonade.

I din't write up an entire tutorial about exactly how I made the blinds, since there are a ton out there and its a bit more custom to your window size and how you want them mounted (inside or outside frame), but I will be sharing with you how I added the bottom panel with the grommets, as well as a few tips and tricks on
products and techniques I used to install my blinds and make them look like a professional made them! (You can take a look at this post to see my Faux Roam Blind tutorial. I used the same technique to make my lined panels for the blinds as well as the same mounting technique.)
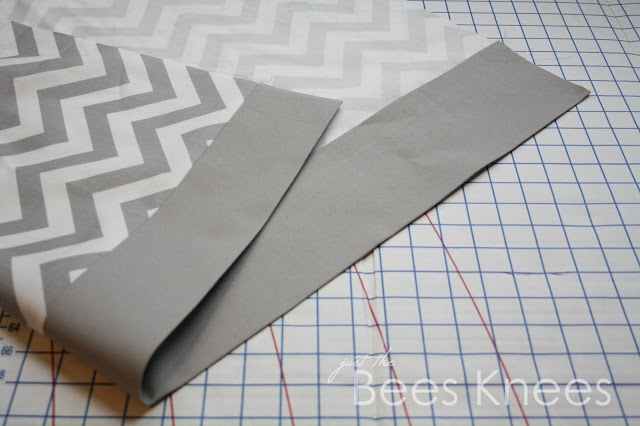
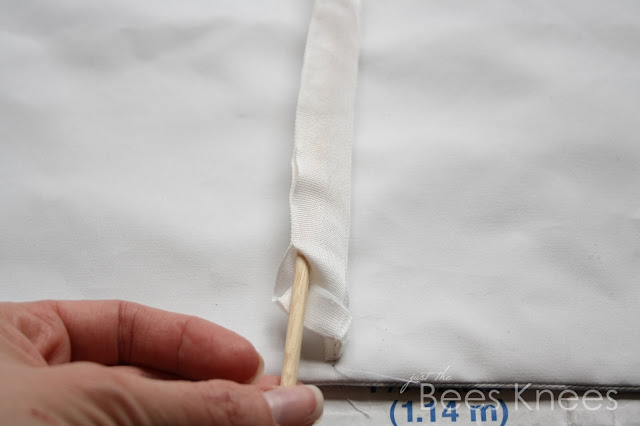
When I started, I just had the chevron fabric cut to size, and I figured I needed to add about 3.5" of length to it so it would fit inside the window frame from top to bottom. I had some extra grey Duck Cloth laying around that happened to be a match, so I cut a piece that was the exact same width as the chevron fabric, and 8" long. I got the 8" because I doubled the length I needed, and then added 1/2" to each end for seam allowances. So for example if you need to add a section that is 5" long, you would cut a piece 11" long. Stitch this piece to the bottom of your fabric, right sides together using a 1/2" seam allowance.

When you insert the grommets, you need a double thickness of fabric, so that is why we cut the pieces twice as long as necessary. Now you are going to get out your trusty iron and press the seam open to make it nice and crisp. Then fold up the bottom edge of the panel 1/2" and press. Finally, fold the bottom panel up in half so the bottom edge meets the seam on the wrong side and press. This is what my panel looks like all neatly pressed.
From here, you are going to finish your panel however you choose, whether it be lined or unlined. I chose to line mine using blackout lining to keep as much daylight out as possible. All of you with young kids know we want them to sleep in as long as possible!! (You can see how I lined my Faux Roman Blinds here. I used the same technique.) If you are not lining your blinds, finish off your edges and header however you choose. To secure the bottom section, simply hem it. I hemmed mine directly to the liner using this tutorial on how to sew a blind hem.
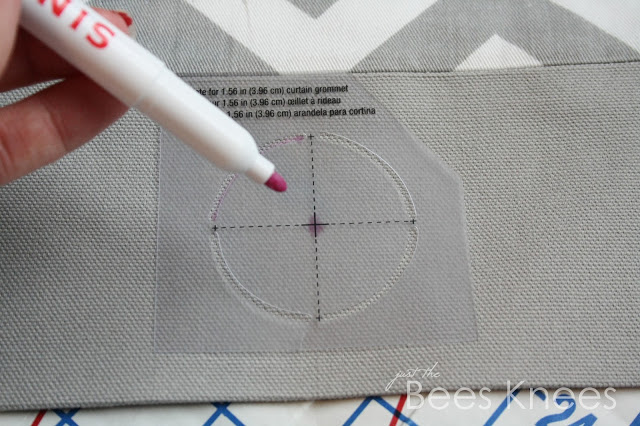
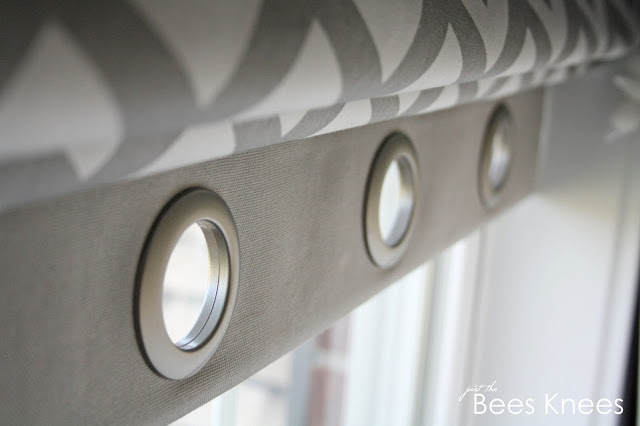
Once your panel is all done we can start installing the grommets. I bought mine from Joann fabrics. They are Dritz 1-9/16-Inch Inner Diameter Curtain Grommets, 8-Pack, Pewter

They don't require and tools and just snap in! Easy peasy. They come with a handy dandy template too which we are going to use now. Simple figure out how many grommets you want to use (I used 5) and space them accordingly. Measure first horizontally to get the spacing right, then vertically to fit the center of where your grommet will go and mark using a disappearing fabric pen.


Now line up the center of the template with the dot you just made and trace your circle. This is your guide to cut the hole in your fabric where the grommet will go.


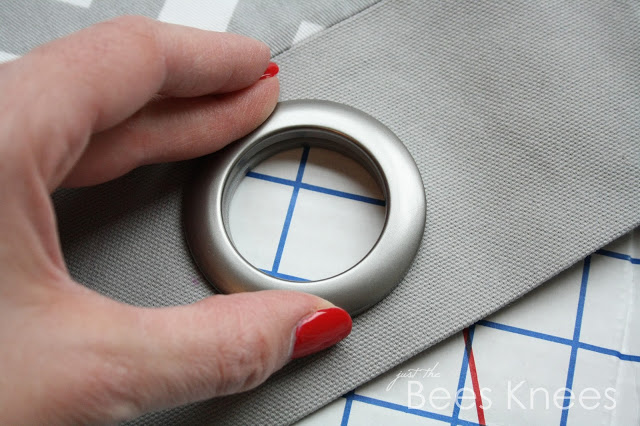
Now that your circles are all drawn, it's time to cut them out and install the grommets! You will notice that one side of the grommet has little "teeth" and the other has "grooves". Simply lay the side with the teeth underneath the fabric lining it up with the hole, and then line up the top piece with the grooves and snap them together.


That's it! Easy right?! This is the same technique you would use if you want to add grommets to the top of your curtain panels too.
Are you still with me?! Good. I hope I haven't confused you yet. Now I'm going to share with you a few products that I use that are easy and deliver professional results when making your own roman blinds.
Have you heard of Roman Shade Tube Tape before?! This is an ingenious product and so much easier than using those little rings that you have to sew on individually to the back of your blinds! They sell it at Joann Fabrics, but I also have it listed in my astore for your convenience.

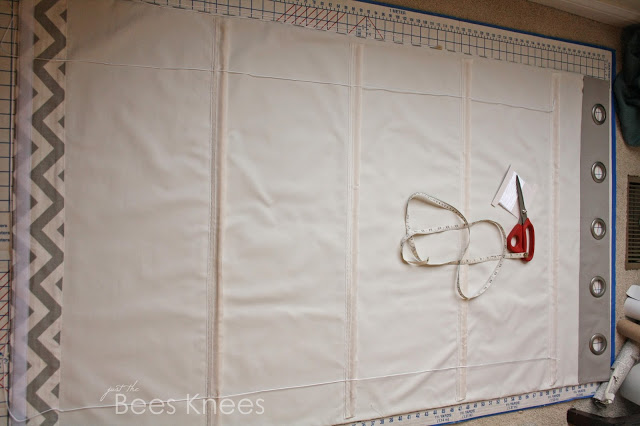
Its tape that has small pockets to string your cord through as well a larger pocket to hold dowels that will give your shades a nice crisp fold. What you do is sew it on horizontally to create your folds. This is the part where a little math comes in. You need to figure out what size you want your folds to be as well as how many folds your blind is going to have. Terrell Designs offers a fantastic calculator tool to help you figure it all out. Just enter in your dimensions and your ideal "stackage" size and it will tell you haw many folds as well as the spacing. Click here to go to that calculator. (They also have a ton of free roman blind instructions too! Click here to view those.) Something to keep in mind....I wanted my grommets to show when the blinds were up, so I took that into consideration when figuring out the spacing on the folds.
Back to the tape.....Once you figure out your tape placement, you want to cut your strips 1" wider than the width of your shade. Before sewing them on, press each edge under 1/2" to create a little pocket so the dowels will stay put after you install them. Sew only the top edge of the tape directly to the back of your panel using a straight stitch. Try and sew this on as straight and level as possible as the stitching will show through on the front of your blind. Once all the tape is sewn on, install the dowels by sliding them through the slit at the bottom of the tape. I picked up my wooden dowels in the craft section at Joann Fabrics and just cut them to size.

When you string the blinds with the cording , you simply direct the cording through the appropriate loop in the tape that lines up with your hardware. I used a measuring tape to measure from the edge to make sure it was evenly strung all the way from top to bottom. Tie a knot after the last loop at the bottom of the shade to secure the Cord.
Tip! An easy way to thread the Cord through the lops is to put a piece of masking tape on the raw end!

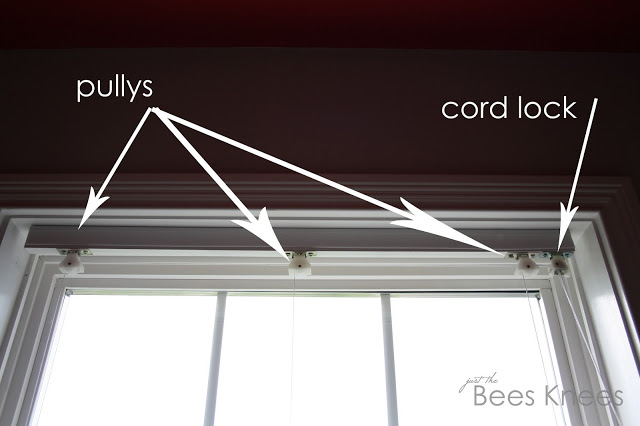
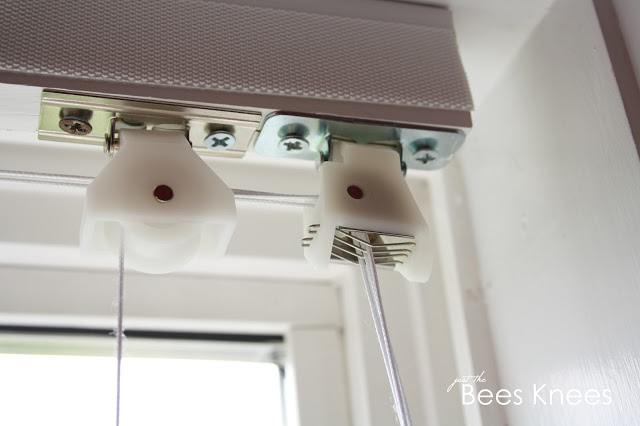
Now that the blind is complete, lets install these babies!! Instead of using eye hooks to thread my cords through on the mounting strip, I use cord pulleys and cord lock . They glide much easier and the cord "locks" into place instead of having to wrap the Cord around a cord cleat.
To house my hardware, I make a mounting strip for my blinds out of a 1x2 piece of wood that is screwed directly into the top of the window frame. On the front of the strip I install a piece of Velcro where the blind attaches. (See this tutorial for more detailed instructions). On the underneath of the strip is where I mount my blind hardware. Since this is a fairly wide blind, I decided to use 3 pulleys so the blind folds are nice and level when pulled up; one in the center, and one about 2-3" from each edge. The cord lock goes on the very end of the strip. You can mount it on the right or left depending on what side you want your cords to hang. The first cord on your blinds gets strung through the first pulley, then the second, then the third and finally through the cord lock. The second cord goes through the second pulley, then the third and so on until all cords are eventually strung through the cord lock.
I ordered my hardware through Amazon and I have also made these available through my astore. Click on the images below for more information on these products or to order some for yourself.
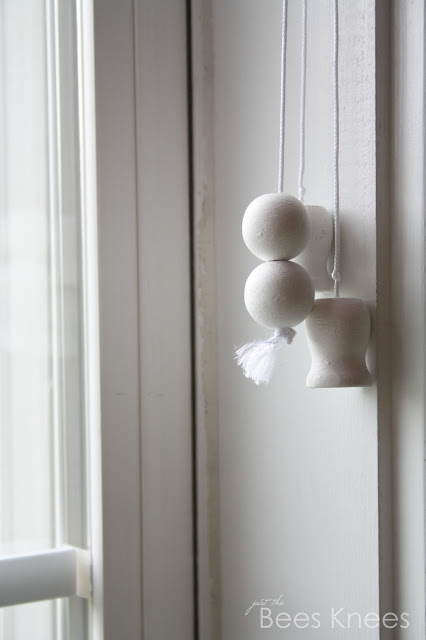
And one last tip for you, when you are finishing off the ends of the cords, instead of using your standard plastic cord pulls, get creative! I used some wood beads that painted white, but there are so many other options you could use! Just take a stroll through the craft or jewelry section of your local craft store to get those creative juices flowing.
Best of luck to you with your blind project! I hope you found this post helpful and not just a jumble of information. If you get stuck or have any questions, feel free to send me an email at sarah@justthebeesknees. In the meantime, here's links to two other tutorials I referenced to earlier that may help as well.


Back to the tape.....Once you figure out your tape placement, you want to cut your strips 1" wider than the width of your shade. Before sewing them on, press each edge under 1/2" to create a little pocket so the dowels will stay put after you install them. Sew only the top edge of the tape directly to the back of your panel using a straight stitch. Try and sew this on as straight and level as possible as the stitching will show through on the front of your blind. Once all the tape is sewn on, install the dowels by sliding them through the slit at the bottom of the tape. I picked up my wooden dowels in the craft section at Joann Fabrics and just cut them to size.
When you string the blinds with the cording
Tip! An easy way to thread the Cord
Now that the blind is complete, lets install these babies!! Instead of using eye hooks to thread my cords through on the mounting strip, I use cord pulleys and cord lock
To house my hardware, I make a mounting strip for my blinds out of a 1x2 piece of wood that is screwed directly into the top of the window frame. On the front of the strip I install a piece of Velcro where the blind attaches. (See this tutorial for more detailed instructions). On the underneath of the strip is where I mount my blind hardware. Since this is a fairly wide blind, I decided to use 3 pulleys so the blind folds are nice and level when pulled up; one in the center, and one about 2-3" from each edge. The cord lock
I ordered my hardware through Amazon and I have also made these available through my astore. Click on the images below for more information on these products or to order some for yourself.
And one last tip for you, when you are finishing off the ends of the cords, instead of using your standard plastic cord pulls, get creative! I used some wood beads that painted white, but there are so many other options you could use! Just take a stroll through the craft or jewelry section of your local craft store to get those creative juices flowing.
Best of luck to you with your blind project! I hope you found this post helpful and not just a jumble of information. If you get stuck or have any questions, feel free to send me an email at sarah@justthebeesknees. In the meantime, here's links to two other tutorials I referenced to earlier that may help as well.
And to tour the rest of Carson's room, click here!

Sharing With:
Frugal Friday @ The Shabby Nest * Friday Flair @ Whipperberry * Weekend Wrap-up Party @ Tatertots & Jello * Saturday Nite Special @ Funky Junk Interiors * Tutorials & Tips @ Home Stories A to Z * Knock Our Socks Off @ Mom4Real * Get Your Craft On! @ Today's Creative Blog * Show Me What Ya Got! @ Not Just a Housewife * The Inspiration Board @ Homework * DIY Project Parade @ DIY Showoff * Home{work} Wednesday @ The Everyday Home, Atta Girls Says, Marty's Musings and Worthing Court , Party Tiime @ The 36th Avenue, * Show & Tell @ SNAP! Creativity * Hookin' Up with House of Hepworths @ House of Hepworths * Transformation Thursday @ The Shabby Creek Cottage * Live Laugh Thursdays @ Live Laugh Rowe * Tutorials & Tips @ Home Stories A to Z