
How to apply a Whitewash finish

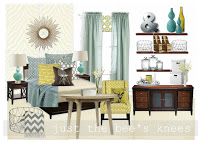
Long ago, when I first started planning my Guest Bedroom/Craft Room, I created a mood board with round whitewashed table to use as my workspace. Here it is in case you need a re-fresher,or are new to these parts (welcome!) and have never seen it before or have no idea what I’m talking about.

Since then, I kind of switched gears started dreaming of a gorgeous glass top trestle table, then quickly realized that a) It’s not in my budget, and b) It’s not very practical for crafting. So I went back to the original plan and decided to re-finish an old beat-up, drop leaf table we had laying around. I had all the paint & supplies on hand so it didn’t cost my anything to do, just time. Here’s a shot of the table before:


As you can see, the top looked like it was in pretty rough shape, but fortunately it was just the finish that was peeling. Nothing a good old electric sander couldn’t fix! This was probably the most tedious part of the job, especially when sanding the turned legs by hand. I used a coarse grit sandpaper to remove the finish first, then lightly sanded again using a fine grit sandpaper to get my surface nice and smooth. (Tip: these Contour Surface Sanding Sponges

After my surface was sanded and wiped down with a damp cloth, I started my paint technique. (Make sure the surface is clean and dry before starting to paint!) I mixed 1 part white paint to 1 part water, but you can adjust this to be more or less opaque. Working in small areas and going WITH the grain, paint on some of your paint mixture, then immediately wipe it off with a dry rag. Try to work quickly as it soaks in and dries very fast on bare wood.

Here you can see that I finished the middle section with 1 coat. Let dry in between coats and re-apply as often as you feel necessary to achieve the effect you want, somewhere between 2-3 coats. I applied 2 coats on my table.

After the paint has fully dried, you can distress your piece of furniture as much or as little as you want. I took a Fine Grit Sanding Sponge


After you are satisfied with the distressing, wipe your piece down with a damp cloth to remove and dust and debris and let dry. Apply your choice of sealer / protectant. I chose to use Minwax Satin Polycrylic

I used a Polycrylic instead of a Polyurethane because the finish is clear. A polyurethane will add a yellow tint to your piece, which is fine when staining wood, but not suitable for a whitewash effect. And the satin finish is much more natural looking than a high gloss. You may also use a wax finish instead, but since I want to use this piece as a work station, the polycrylic will be more durable.
To apply, brush on 2-3 coats of the sealer using a high quality brush, or whatever the manufacturer recommends. Let each coat dry and sand with a Super Fine 400 Grit Sandpaper


I’m really pleased with the way it turned out!! The beauty of this technique is it's fairly quick and easy and doesn't have to be perfect. The imperfections is what gives it that rustic charm! And with the money I saved, I can splurge on these to finish off my room:)


Robert Allen RA Vintage Plumes - Jade Fabric

Check out my other completed projects for this room!
 |
| Guest Bedroom/Craft Room Mood Board |
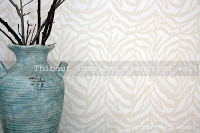 |
| Thibaut Inspired Stenciled wall |

Weekend
Wrap-up Party @ Tatertots & Jello
* Saturday Nite Special @ Funky
Junk Interiors * Overflowing With Creativity @ It’s Overflowing * It’s
Party Time! @ Setting for 4 ,Three Mango Seeds, Cupcakes
and Crinolin, It’s So
Very Cheri * The Sunday Scoop @ I Heart Naptime * The DIY Project Parade @ The DIY Showoff * Tutorials & Tips @ Home Stories A to Z * Get Your Craft
On! @ Today's Creative Blog
* Hookin' Up with House of Hepworths @ House of Hepworths * Transformation Thursday @ The Shabby Creek Cottage * Live Laugh
Thursdays @ Live Laugh Rowe * Flaunt It Friday @ Chic on a Shoestring
Decorating * Frugal Friday @ The
Shabby Nest * The
Humble Brag @ One Project Closer * Happy Hour @ Craftberry Bush, Crafty, Scrappy Happy & Design, Dining & Diapers * Furniture Feature Friday @ Miss Mustard Seed