
Painted Tree Pumpkins
I was leafing through Pinterest the other day looking for Fall Decorating ideas for my front porch, and was thrilled to come across this image from Good Housekeeping.
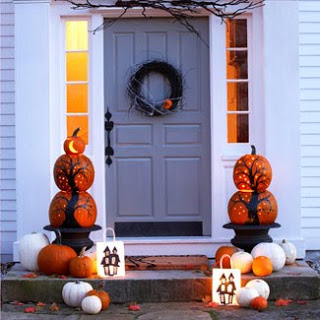
I was tickled because I actually saw this image a few years ago and loved it so much that I created my own version for our front porch!

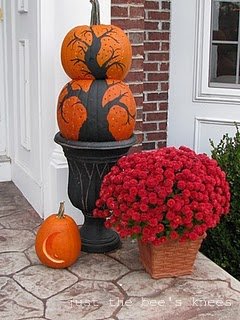
First I carved out both pumpkins, making sure that the opening for the bottom pumpkin was large enough to hold the top pumpkin nice and stable.
Next I simply painted on the tree using plain old black craft paint. (Just make sure the pumpkin surface is clean and dry.)
Then to add the holes around the tree, I simply used my drill. I probably should have drilled my holes a bit bigger,so more of the light shone through, but it did look really cool all lit up at night! Wish I had a picture of that:(
I'm still looking for supplies to finish up my spooky door decor for this year. Any one have a 11x13 or similar size chunky, gaudy ornate frame they want to donate?!? An no, I'm NOT kidding!!
Until next time!
Sarah:)
Linking this post up to:
All Things Spooky party at All Things Thrifty
What's Up Wednesdays @ Sew Woodsy
Weekend Wrap up Party @ Tatertots and Jello
Tutorials & Tips @ Home Stories A to Z
Thrifty Thursday @ Thrifty Decorating
